

Your ice maker has stopped making ice most likely because of a clogged water filter, a frozen fill tube, a faulty water inlet valve, incorrect freezer temperature, or a tripped control arm. In most cases, Lakeway homeowners can diagnose the problem in under ten minutes, and a certified appliance repair technician can fix it the same day.
Picture this. It is a July afternoon in Lakeway, TX. The thermometer outside is pushing 103 degrees. You reach into the freezer for a glass of ice and find an empty bin. The ice maker has been sitting there, motor running, doing absolutely nothing for who knows how long.
If this sounds familiar, you are in good company. Ice maker failures are one of the most frequently reported appliance issues across Travis County and the broader Lake Travis area. They spike every summer without fail, and for good reason. The extreme Texas heat puts enormous demand on refrigeration systems, and when every appliance in your home is working overtime just to keep up, the ice maker is often the first component to show signs of stress.
The good news is that ice makers are actually one of the more straightforward appliance problems to diagnose. Unlike a failing compressor or a control board issue, most ice maker problems trace back to a handful of very specific components. Work through them in the right order and you will find the cause quickly without replacing parts unnecessarily or paying for a diagnostic you did not need.
This guide walks you through every cause, every check, and every fix, written specifically for homeowners in Lakeway, Bee Cave, Steiner Ranch, Hudson Bend, and the surrounding communities where hard water and summer heat make ice maker problems more common than almost anywhere else in Central Texas.
How an Ice Maker Actually Works
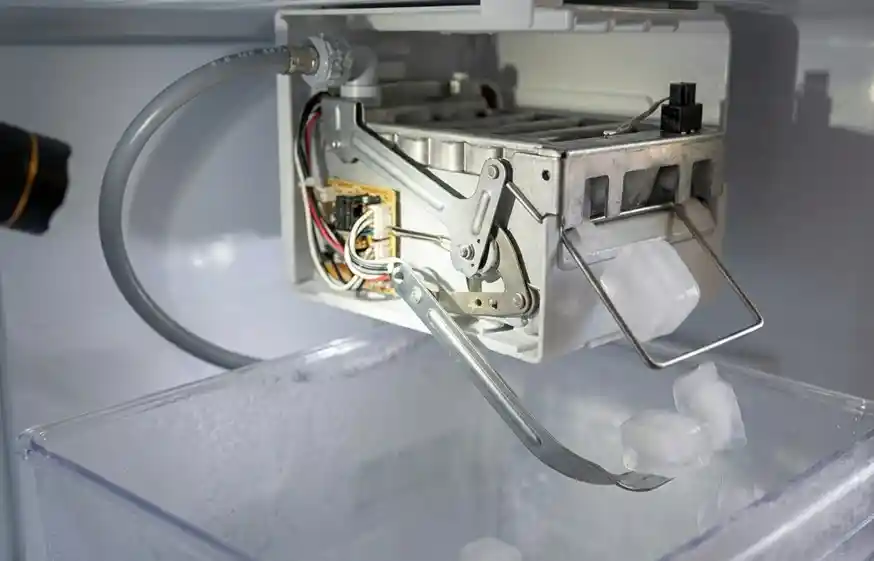
Before diving into causes, it helps to understand what the machine is supposed to do. An automatic ice maker follows a simple repeating cycle. Water flows in through a supply line connected to your home’s plumbing, passes through a water inlet valve, and fills a mold inside the freezer compartment. The freezer’s cooling system freezes the water into individual cubes over a period of roughly 90 minutes per cycle. Once the mold thermostat confirms the ice has reached the correct temperature, a small heating element briefly warms the bottom of the mold just enough to loosen the cubes. An ejector arm then pushes them into the storage bin below. A control arm or infrared sensor monitors the fill level in the bin and signals the ice maker to pause production when the bin is full.
When any single step in that cycle fails, ice production stops completely. That is why the symptoms can look so similar across very different causes. Whether the problem is a blocked water line, a faulty valve, a frozen fill tube, or a stuck control arm, the result is always the same from your perspective: an empty ice bin.
Cause 1: The Control Arm or Ice Level Sensor Is in the Off Position
This is the single most common cause of an ice maker that appears completely dead, and it takes about ten seconds to check. Every ice maker has a mechanism to detect when the storage bin is full and stop production automatically. On older and most standard models, this is a metal wire arm called the feeler arm or bail wire. When the bin fills with ice, the rising ice level pushes this arm upward into the off position, and the ice maker stops cycling.
The problem is that this arm can get knocked into the off position by a bag of frozen vegetables, a container pushed too far back in the freezer, or even a large batch of ice sliding around in the bin. It sits there in the off position looking perfectly normal while your ice maker does absolutely nothing.
What to check: Open your freezer and look at the ice maker assembly. You should see a metal wire arm extending from the side of the unit. If it is raised or horizontal rather than pointing downward, push it firmly down into the on position. Give the ice maker a few hours and check back for new ice production.
On newer Samsung, LG, and KitchenAid models, the feeler arm has been replaced by an infrared optical sensor or a white plastic paddle. These can be blocked by frost buildup or a chunk of ice stuck in the bin. Clear any obstructions and make sure the sensor area is clean and unobstructed.
Cause 2: The Water Filter Is Clogged
The refrigerator water filter removes sediment, chlorine, and other contaminants from the water before it reaches both the door dispenser and the ice maker. As the filter accumulates debris over time, water flow through it decreases. When flow restriction becomes severe enough, the water inlet valve cannot receive sufficient pressure to open properly, and the ice maker stops receiving water entirely.
This is a particularly significant issue in Lakeway and the surrounding areas of Travis County. The municipal water supply throughout Central Texas is classified as moderately to significantly hard, meaning it contains elevated concentrations of calcium carbonate and magnesium. These minerals accelerate filter clogging at a rate much faster than homeowners in softer water regions experience. A filter that might last six months in other parts of the country may need replacement every three to four months in a Lakeway home with heavy ice maker use.
What to check: Most refrigerator manufacturers recommend replacing the water filter every six months. If you cannot remember the last time you changed yours, that is a strong clue. Check the filter indicator light on your refrigerator’s control panel if it has one. Some models will flash or change color when a filter replacement is due. Replacing the filter is typically a twist-off process that takes under two minutes and costs between $20 and $60 depending on your refrigerator brand and model.
After installing a new filter, run two to three gallons of water through the door dispenser before expecting ice production to resume. This purges trapped air from the water line and ensures consistent pressure reaches the ice maker.
Cause 3: Incorrect Freezer Temperature
The ice maker cannot produce ice if the freezer compartment is not cold enough. The ideal freezer temperature for consistent ice production is between 0 and 5 degrees Fahrenheit. When the freezer temperature rises above 10 degrees, ice production slows significantly. Above 15 degrees, it stops altogether.
Several things can push freezer temperature above the required range. A worn or damaged door gasket allowing warm air to seep in is one of the most common in Lakeway’s humid climate. An overstuffed freezer blocking the internal airflow vents is another. In homes where the refrigerator is located in a garage that reaches 110 degrees or higher during summer, the compressor may struggle to maintain target freezer temperatures under extreme ambient heat conditions.
What to check: Use an appliance thermometer to verify the actual temperature inside your freezer, not just the display reading. Set it to 0 degrees Fahrenheit and give the unit 24 hours to stabilize. Inspect the door gasket for cracks, tears, or sections that are not sealing flush against the frame. Reorganize the freezer to ensure air vents are not blocked by food containers or storage bags. If you have a second refrigerator in a hot garage space, relocating it to a climate-controlled area can make a dramatic difference in both ice production and overall appliance lifespan.
Cause 4: Frozen Fill Tube
The fill tube is a small plastic tube that carries water from the water inlet valve into the ice maker mold. In the freezer environment, this tube is naturally exposed to very cold temperatures, and under certain conditions it can freeze solid from the inside, completely blocking water flow to the ice mold.
A frozen fill tube typically develops when the freezer temperature drops below the optimal range, when the defrost cycle is not functioning properly, or when water drips back into the tube between cycles and refreezes. You may notice that the ice maker motor runs and the ejector arm moves through its cycle but no new ice appears in the bin, because the mold is never receiving water.
What to check: Locate the fill tube at the back of the freezer compartment near the ice maker assembly. It is a narrow tube roughly the diameter of a pencil. If you see frost or ice on the exterior of the tube, the interior is almost certainly frozen. You can attempt to thaw it carefully using a hair dryer set to the lowest heat setting, holding it at least six inches from the tube and moving it slowly. Never use an open flame or high heat near plastic refrigerator components.
If the fill tube freezes repeatedly after being thawed, the underlying cause is usually a defrost system issue or a faulty water inlet valve that is allowing water to drip back into the tube between cycles. That will require a technician to diagnose and repair properly.
Cause 5: Faulty Water Inlet Valve
The water inlet valve is an electromechanical solenoid valve that sits at the back of the refrigerator where the water supply line connects. When the ice maker initiates a fill cycle, it sends an electrical signal to this valve telling it to open and allow water in. The valve requires a minimum water pressure of 20 PSI to function correctly. If the valve itself has failed, if the solenoid has burned out, or if water pressure from your home’s supply is insufficient, the ice mold will not fill and ice production will stop.
A partially failing water inlet valve often shows a very specific symptom: water continues to flow through the door dispenser normally, but the ice maker produces nothing. This happens because most refrigerators use a dual-solenoid valve with one port controlling the dispenser and a separate port controlling the ice maker. The ice maker port can fail independently while the dispenser continues working perfectly.
What to check: If your door dispenser is working fine but the ice maker is not receiving water, the water inlet valve is a strong suspect. You can check the water supply line pressure by disconnecting it at the back of the refrigerator and letting water run briefly into a bucket. Adequate flow confirms the home supply is not the issue. Testing the valve solenoid itself requires a multimeter to check for electrical continuity. Replacing a water inlet valve is a repair that most technicians handle in under an hour with a relatively inexpensive OEM part specific to your refrigerator model.
Cause 6: Ice Maker Module or Mold Thermostat Failure
The ice maker module is the control unit that manages the entire ice production cycle, coordinating the water fill, the freeze time, the heating element, and the ejector arm in the correct sequence. The mold thermostat is the sensor inside the module that monitors the temperature of the ice mold and signals the module to begin the harvest cycle once the ice has reached the correct temperature.
If the mold thermostat is defective, it may never register that the mold has reached freezing temperature, so the harvest cycle never starts and no ice is ejected. The mold fills with water and the water freezes, but the ice just sits there indefinitely because the module never receives the signal to release it.
A failed ice maker module may cause the entire assembly to go silent. The motor does not run, the ejector arm does not move, and the fill tube receives no signal to deliver water. On many models, replacing the entire ice maker assembly as a unit is more cost-effective than sourcing individual internal components, and a technician can usually swap one out in a single visit.
Cause 7: Ice Clumping in the Bin
Sometimes the ice maker is actually producing ice correctly, but the ice cubes are clumping together in the storage bin into one large frozen mass. This happens when the freezer door is opened frequently, allowing warm humid air to enter, partially melt the surface of the ice, and then refreeze it into a solid block. In Lakeway’s humid summers, this is an especially common issue.
When the ice bin is full of a solid clump rather than individual loose cubes, the control arm or level sensor reads it as a full bin and halts production. The bin appears to have ice in it, but none of it can be dispensed.
What to check: Pull the ice bin completely out of the freezer and inspect it. If the ice has fused into large chunks or a solid mass, empty it, wash the bin with warm water, dry it thoroughly, and reinstall it. The ice maker should begin a fresh production cycle within a few hours. To prevent this from recurring, avoid leaving the freezer door open longer than necessary and make sure the door gasket is sealing properly.
Brand-Specific Ice Maker Issues Common in Lakeway Homes
After reviewing the service history of appliance repair companies across Travis County and the Lake Travis corridor, some very clear brand-specific patterns emerge that Lakeway homeowners should know about.
LG refrigerators with the dual ice maker system, particularly French door models with both an in-freezer ice maker and a craft or slim ice maker in the door, have a well-documented history of ice maker failures. The craft ice maker in the freezer door is especially prone to issues related to water line freezing and optical sensor malfunctions. LG has issued several technical service bulletins addressing these problems on specific model lines. If you own an LG French door refrigerator and your ice production has stopped or become inconsistent, the optical sensor, the ice maker fan, or the door water line are the most likely culprits.
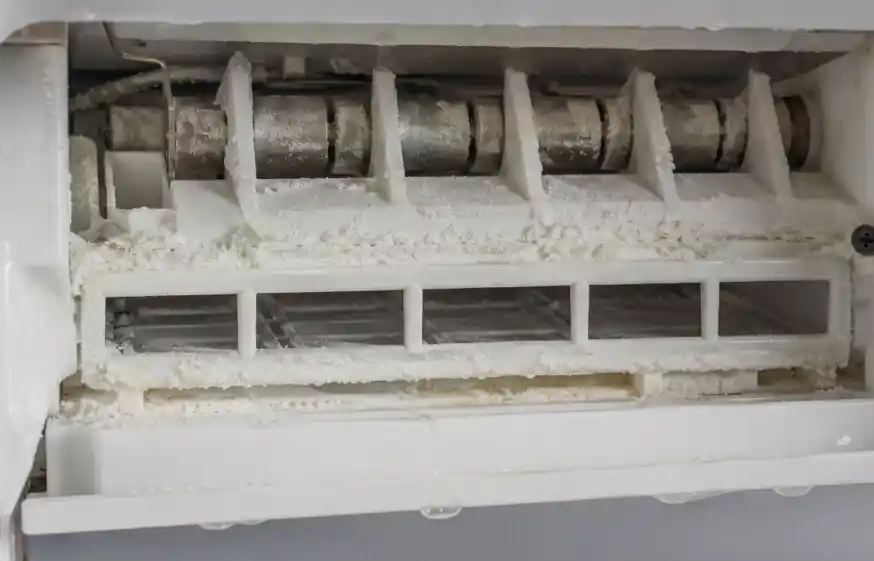
Samsung refrigerators, especially Family Hub and French door models manufactured between 2016 and 2022, have had widespread ice maker issues related to frost accumulation inside the ice maker compartment. Ice builds up around the fan and the ice maker assembly over time, preventing the fan from circulating cold air and blocking the mechanical components from cycling. Samsung released a software update for some models that adjusts the defrost cycle frequency to address this, but many units require a forced defrost procedure or a physical repair to the ice maker housing. If your Samsung ice maker stops producing ice after seeming fine for several years, frost accumulation inside the compartment is the most likely cause.
Whirlpool and KitchenAid refrigerators share many components and generally have a strong reliability record for ice makers, but the water inlet valve tends to be the most common failure point after five to seven years of use, particularly in areas with hard water like Lakeway. The hard water mineral deposits that accumulate inside the valve’s small orifices restrict flow gradually until the ice maker stops receiving adequate water.
Sub-Zero refrigerators, which are found in many of the custom luxury homes throughout the Lake Travis corridor and surrounding neighborhoods, use a proprietary ice maker design that requires manufacturer-trained technician service. Sub-Zero ice maker components are not universally interchangeable with standard parts, and attempting to service them without the correct tools and training often creates additional problems.
GE and GE Profile refrigerators frequently experience ice maker module failures after several years, particularly on side-by-side models. The ejector motor inside the module is a common failure point that requires replacing the entire ice maker assembly rather than an individual component.
How Hard Water in Lakeway Accelerates Ice Maker Failures
This is the part of the conversation that most generic repair guides completely skip over, and it is critically important for homeowners in the Lakeway area to understand.
The water supply throughout Travis County and the Lake Travis region carries a significant mineral load compared to the national average. Calcium carbonate and magnesium deposits build up inside water lines, water filters, water inlet valves, and ice molds continuously with every single cycle your ice maker runs. Over time, this accumulation narrows the internal passageways through which water must flow, reduces pressure at the inlet valve, and creates scale deposits inside the ice mold that interfere with the heating element’s ability to release frozen cubes cleanly.
Lakeway homeowners who do not stay current on water filter replacements, who do not periodically flush their refrigerator water lines, and who do not use a whole-home water softener or filtration system are accelerating the wear on their ice maker components significantly. What might be a ten-year lifespan for an ice maker water inlet valve in a soft-water market can realistically be cut in half in Central Texas without proper maintenance.
The practical solution involves three habits. Replace your refrigerator water filter every three to four months rather than every six. If you notice white mineral deposits building up around your water dispenser nozzle or on the interior walls of the ice maker, run a cleaning cycle using a diluted citric acid solution approved for refrigerator use. And if you have been considering a whole-home water softener for your Lakeway residence, your ice maker’s repair history is a good argument for making that investment.
Step-by-Step Troubleshooting Sequence for Lakeway Homeowners
Work through these checks in order before calling a repair technician. Starting with the simplest checks prevents unnecessary service calls and helps you give the technician accurate information if a repair is needed.
Step one: Verify the ice maker is switched on. Open the freezer and locate the on/off switch or confirm the control arm is in the down position. This sounds obvious but resolves a surprising number of service calls.
Step two: Check the freezer temperature. Confirm it is set to 0 degrees Fahrenheit and use an appliance thermometer to verify the actual reading rather than relying solely on the digital display.
Step three: Inspect the water filter. If it has been more than four months since the last replacement, install a new one and run two gallons of water through the dispenser before expecting ice production.
Step four: Check the water supply line. Pull the refrigerator away from the wall and look for kinks in the water supply line. Confirm the saddle valve at the wall connection is fully open.
Step five: Inspect the fill tube for ice. If you see frost on the exterior of the fill tube, attempt to thaw it carefully as described above.
Step six: Empty the ice bin and check for clumping. Remove any fused ice masses, wash and dry the bin, and reinstall it.
Step seven: Reset the ice maker. Unplug the refrigerator for five minutes, then restore power. On LG models, there is a dedicated test button on the ice maker assembly that initiates a manual harvest cycle to confirm function. Consult your owner’s manual for the correct reset procedure for your specific model.
If none of these steps restores ice production, the problem is almost certainly a component failure inside the water inlet valve, the ice maker module, or the mold thermostat, all of which require a technician.
When to Call a Professional Ice Maker Repair Technician in Lakeway
Call a certified appliance repair technician if the following conditions apply. You have worked through all the basic checks above without restoring ice production. The fill tube freezes repeatedly after being thawed. The ice maker motor runs but no water enters the mold after confirming the water filter and supply line are clear. Your Samsung or LG ice maker has frost visibly building up inside the compartment around the assembly. The ice maker produces ice but it tastes bad or smells off despite a recently replaced water filter. Any repair that involves the water inlet valve, the ice maker control module, internal wiring, or sealed system components.
A reputable appliance repair company serving the Lakeway area should offer same-day or next-day appointments, carry common ice maker parts and water inlet valves for major brands on their service vehicles, provide a complete repair estimate before any work begins, and back their repairs with a parts and labor warranty of at least 90 days.
Repair vs. Replacement: When Does It Make Sense to Replace the Ice Maker
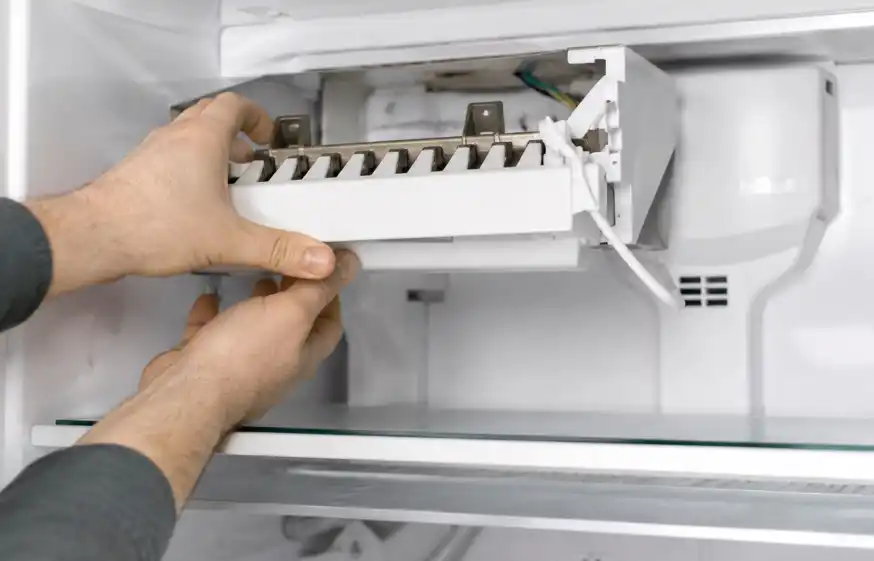
Ice maker assemblies are self-contained units in most refrigerator models and can often be replaced as a complete unit rather than trying to repair individual internal components. Replacement ice maker assemblies for most Whirlpool, KitchenAid, Maytag, GE, and Samsung refrigerators are widely available as OEM parts and typically cost between $80 and $250 depending on the model. Labor to swap one out runs one to two hours.
If your refrigerator itself is more than twelve years old and has already required other repairs, the conversation shifts. An older compressor, aging control board, and worn door gaskets alongside a failed ice maker may indicate that the appliance as a whole is reaching the end of a cost-effective repair window. Your technician can help you assess the total condition of the refrigerator and make an honest recommendation based on repair cost relative to the appliance’s remaining useful life.
For Sub-Zero, Viking, Miele, and Thermador refrigerators, the repair-versus-replace calculation is different. These are appliances with 15 to 20-year design lifespans and replacement costs in the thousands. Ice maker repairs on these brands are almost always worth completing by a factory-trained technician even at a higher service cost.
Ice Maker Maintenance Schedule for Lakeway Homeowners
Every three to four months: Replace the refrigerator water filter. In Lakeway’s hard water environment, this single habit prevents more ice maker failures than any other maintenance step.
Every six months: Pull the refrigerator away from the wall and inspect the water supply line for kinks, cracks, or wear. Check that the saddle valve connection is secure and not weeping any moisture.
Once a year: Empty and wash the ice storage bin with warm soapy water and dry it completely before reinstalling. Wipe down the interior of the ice maker compartment with a damp cloth to remove any mineral residue or debris.
As needed: If you notice a reduction in ice production volume or ice cubes coming out smaller than usual, check the water filter first. Reduced cube size is typically the earliest sign of restricted water flow before the ice maker stops completely.
Frequently Asked Questions
Why is my ice maker not making ice but the water dispenser works fine?
This almost always points to the water inlet valve. Most refrigerators use a dual-port valve where one port serves the dispenser and a separate port serves the ice maker. The ice maker port can fail independently. A technician can test the valve and replace it in a single visit.
How long does it take for an ice maker to start producing ice after a repair?
After a filter replacement, reset, or thawed fill tube, most ice makers will produce their first batch of ice within three to six hours. A newly installed ice maker assembly typically takes twelve to twenty-four hours to reach full production.
Why does my ice taste bad even after replacing the filter?
Run two to three gallons of water through the dispenser after installing a new filter to flush any air or carbon particles from the new filter medium. If the taste persists, the ice bin may have absorbed freezer odors and should be emptied, washed, and dried completely.
How much does ice maker repair cost in Lakeway TX?
Ice maker repairs in the Lakeway area typically range from $150 to $350 depending on the component. A water inlet valve replacement usually runs $100 to $200 including labor. A complete ice maker assembly replacement ranges from $200 to $400 for most standard brands. Diagnostic service calls typically cost $75 to $100 and are usually credited toward the repair.
Why does my ice maker keep freezing up?
Repeated freezing of the ice maker fill tube or compartment usually indicates a defrost system issue, a faulty water inlet valve dripping between cycles, or a door gasket that is allowing warm humid air to enter the freezer repeatedly. A technician can pinpoint which of these is the underlying cause.
The Bottom Line for Lakeway Homeowners
An ice maker that has stopped working is almost never a sign that your refrigerator needs replacing. In the vast majority of cases the cause is something specific, diagnosable, and fixable, often in a single service visit. Start with the simple checks: the control arm position, the freezer temperature, the water filter, and the fill tube. Clear any ice clumping in the bin and reset the unit. If none of that restores production, you have a component failure that a certified local technician can repair quickly.
For homeowners throughout Lakeway, Bee Cave, Steiner Ranch, Hudson Bend, and the Lake Travis area, staying ahead of hard water deposits with regular filter replacements is the single most effective long-term strategy for keeping your ice maker running reliably through every Texas summer. If your ice maker has stopped producing and you need a fast, honest diagnosis from a technician who understands local conditions, reach out to a certified appliance repair specialist in Lakeway for same-day service.